Welcome to our comprehensive guide on contouring and highlighting! This technique enhances facial features by creating shadows and highlights, adding depth and dimension to your face․ Contouring uses darker shades to create illusions, while highlighting brightens key areas for a radiant look․ Explore how to master this makeup essential for a polished, professional finish․
1․1 What is Contouring and Highlighting?
Contouring and highlighting are makeup techniques used to enhance facial features by creating depth and dimension․ Contouring involves applying darker shades to areas you want to recede, such as the sides of the nose or jawline, mimicking natural shadows․ Highlighting uses lighter tones to brighten areas like cheekbones, the nose tip, or cupid’s bow, drawing attention to these features․ Together, they create a balanced, defined look that enhances your natural beauty without appearing overly dramatic․
1․2 Importance of Contouring and Highlighting in Makeup
Contouring and highlighting are essential techniques in makeup as they enhance facial features, creating depth and dimension․ These techniques allow you to define areas like cheekbones, jawlines, and noses while brightening high points for a radiant glow․ They transform a flat, one-dimensional face into a sculpted, balanced look․ By mimicking natural shadows and light, contouring and highlighting create a polished, professional finish․ Whether subtle or dramatic, these techniques are versatile, making them suitable for everyday looks or special occasions, and are key to achieving a confident, put-together appearance․
1․3 Brief History of Contouring and Highlighting Trends
Contouring and highlighting have evolved over centuries, with roots in ancient Egypt and Greece, where makeup was used to enhance features․ In the 20th century, Hollywood makeup artists popularized contouring for on-screen impact․ The 90s saw a rise in contouring kits, while the 2000s brought highlighting to the forefront․ Today, social media has democratized these techniques, with tutorials and products widely available․ From subtle natural looks to dramatic transformations, contouring and highlighting remain essential tools in modern makeup artistry, adapting to trends while maintaining their timeless appeal․
Understanding Your Face Shape
Understanding your face shape is crucial for effective contouring and highlighting․ Common types include round, oval, heart, and square shapes, each requiring tailored techniques to enhance natural features․
2․1 Identifying Your Face Shape
To identify your face shape, measure your facial features or use a mirror to observe its overall structure․ Common face shapes include round (symmetrical with full cheeks), oval (balanced proportions), heart (wide forehead and temples with a narrow chin), and square (strong jawline and equal proportions)․ Knowing your face shape helps determine where to apply contour and highlight for the most flattering results․ Use a ruler or natural alignment to assess your features accurately and choose techniques tailored to your shape․
2․2 How Face Shape Affects Contouring and Highlighting
Your face shape significantly influences how contouring and highlighting should be applied․ For example, round faces benefit from contouring the temples and jawline to create length, while oval faces can contour lightly for subtle definition․ Heart-shaped faces focus on softening the forehead and enhancing the lower face, and square faces require softer contouring to avoid harsh angles․ Understanding your face shape allows you to strategically place highlights and shadows, enhancing natural features while creating balance and harmony in your makeup look․
2․3 Common Face Shapes: Round, Oval, Heart, Square
Understanding your face shape is key to effective contouring and highlighting․ A round face is characterized by wide cheekbones and a shorter jawline, while an oval face is longer than it is wide with balanced proportions․ A heart-shaped face features a broad forehead and temples with a narrower chin, and a square face has strong angles and equal length and width․ Each shape requires tailored techniques to enhance natural features and create harmony․ Identifying yours is the first step to mastering contouring and highlighting for a flawless look․

Tools and Products Needed
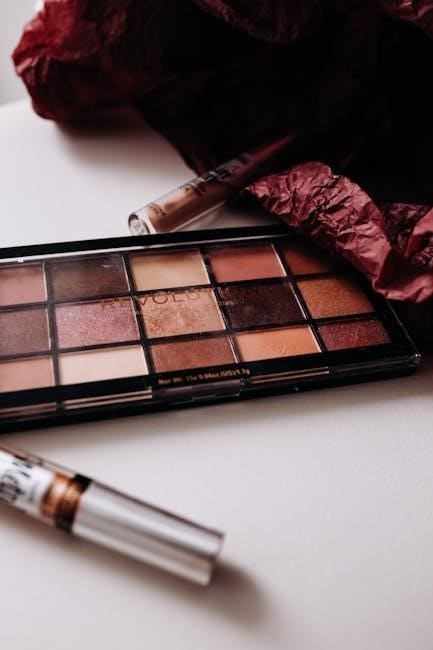
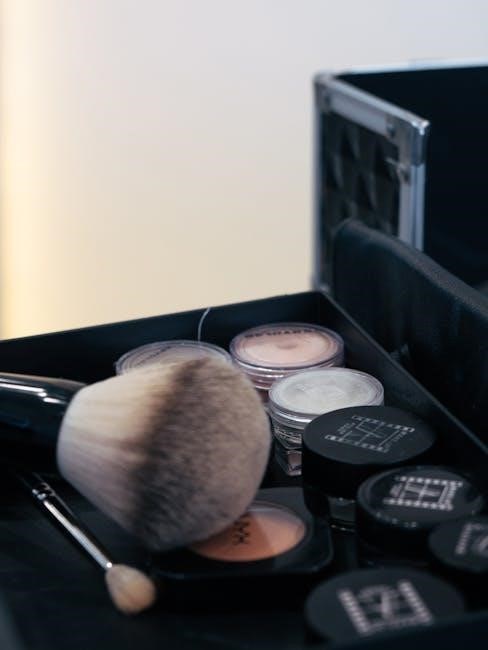
Essential tools include contour brushes, highlighter sponges, and angled makeup brushes for precise application․ Use a contour kit with shades tailored to your skin tone, primer for smooth base, and setting powder to blend seamlessly for a professional finish․
3․1 Essential Brushes for Contouring and Highlighting
Invest in quality brushes for precise application․ An angled contour brush is ideal for defining cheekbones and jawlines, while a smaller flat brush works well for highlighting areas like the nose and cupid’s bow․ A round buffer brush blends contour and highlight seamlessly․ For a natural finish, use light strokes and build coverage gradually․ Regularly clean your brushes to maintain hygiene and ensure optimal makeup application․ The right tools elevate your contouring and highlighting technique, making the process easier and more effective․
3․2 Best Products for Contouring and Highlighting
Choose contour products one to two shades darker than your skin tone for natural depth․ Highlighters should be one to two shades lighter to brighten key areas․ Cream or powder formulas work well for contouring, while liquid or cream highlighters offer a radiant glow․ Select products that complement your skin type—matte for oily skin, shimmer for dry․ Pair with a setting powder to extend wear and ensure a seamless finish․ Invest in a versatile palette for convenience and versatility in achieving your desired look․
3․3 Importance of Primer in Contouring and Highlighting
Primer is essential for creating a smooth canvas for contouring and highlighting․ It ensures makeup adheres evenly, enhancing the longevity and blendability of products․ A good primer hydrates the skin, controls shine, and fills pores, allowing contour and highlight to look natural․ Without primer, products may cake or fade quickly․ It’s a crucial step for achieving a polished, professional finish and bringing out the true pigments of your contour and highlight shades․

Preparation and Skin Care
Proper skin preparation is key for contouring and highlighting․ Cleanse, moisturize, and hydrate to create a smooth base․ This ensures products blend seamlessly for a natural look․
4․1 Skin Preparation Before Contouring and Highlighting
Proper skin preparation is essential for contouring and highlighting․ Start by cleansing your face to remove dirt and oil, then moisturize to hydrate your skin․ Apply a primer to create a smooth base for makeup․ Lightly dust a finishing powder over your face to set the primer and foundation, ensuring a seamless blending process․ Hydration is key, as it helps makeup adhere evenly and prevents patchiness․ A well-prepared canvas ensures your contour and highlight will look natural and last longer․
4․2 Moisturizing and Priming for Optimal Results
Moisturizing and priming are crucial steps before contouring and highlighting․ Hydrated skin ensures a smooth, even base for makeup application, while primer creates a barrier that enhances product adhesion and longevity․ Applying a lightweight moisturizer tailored to your skin type helps maintain hydration levels, preventing dry patches․ Primer smooths out pores and texture, allowing contour and highlighter to blend seamlessly․ These steps ensure your makeup looks fresh and polished, amplifying the effectiveness of your contouring and highlighting techniques for a professional finish․
4․3 Hydration and Its Role in Makeup Application
Hydration is essential for achieving a smooth, flawless makeup application․ Well-hydrated skin appears plump and radiant, creating an ideal canvas for contouring and highlighting․ Proper hydration minimizes pores and fine lines, ensuring products blend seamlessly․ Dehydrated skin can lead to uneven makeup application and accentuate imperfections․ Drinking water and using hydrating products helps maintain skin elasticity, allowing makeup to last longer․ Hydration enhances the natural glow of your skin, making highlighters pop and contours blend effortlessly for a polished, professional look․
Step-by-Step Contouring Guide
Master the art of contouring with this easy-to-follow guide․ Learn how to select shades, apply product to key areas, and blend for a natural, defined look․
5․1 Selecting the Right Contour Shade for Your Skin Tone
Choosing the perfect contour shade is crucial for a natural look․ Select a shade 1-2 tones deeper than your skin tone, matching your undertones for a seamless blend․ Cool tones suit pale skin, while warm tones complement deeper complexions․ Test shades on your jawline to ensure the contour mimics natural shadows․ Avoid ashy or orange-based products, as they can look unnatural․ The right shade will enhance your features without appearing artificial, creating a subtle, defined contour effect that complements your makeup base flawlessly․
5․2 Applying Contour to Key Areas: Cheekbones, Jawline, Nose
Contouring key areas like cheekbones, jawline, and nose enhances facial structure․ Start by applying contour to the hollows of your cheekbones, blending upward and outward for a lifted look․ Lightly trace the jawline with soft strokes to define its shape․ For the nose, apply contour to the sides, blending well to create a slimmer appearance․ Use a contour brush for precise application and blend thoroughly for a natural, seamless finish․ This technique adds depth and dimension, shaping your features effortlessly․
5․3 Blending Techniques for a Natural Look
Blending is essential for a seamless contour and highlight application․ Start by applying contour with light pressure, then feather the edges outward using a fluffy brush․ For a natural look, blend upward and outward on the cheekbones and jawline․ Use gentle, sweeping motions to soften harsh lines, ensuring the transition between shades is smooth․ Avoid over-blending, as it can erase the definition․ Instead, focus on creating a subtle gradient that enhances your features without appearing artificial․ Proper blending ensures your contour and highlight look effortless and natural․

Step-by-Step Highlighting Guide
Master the art of highlighting with this guide! Learn how to apply highlighter to key areas for a natural glow, enhancing your features and creating a radiant appearance․
6․1 Choosing the Perfect Highlighter for Your Skin Type
Choosing the right highlighter for your skin type is key to achieving a natural glow․ For dry skin, opt for creamy or liquid highlighters to maintain moisture․ Oily skin benefits from powder highlighters for a matte finish․ Combination skin can use either, depending on preference․ Consider your skin tone: cooler tones look great with pink or purple undertones, while warmer tones shine with peach or gold․ Test highlighters on your jawline to ensure a seamless match․ This step ensures your glow looks effortless and complements your natural complexion perfectly․
6․2 Applying Highlighter to High Points: Cheekbones, Nose, Cupid’s Bow
Apply highlighter to the high points of your face for a radiant glow․ Use a fan brush to sweep highlighter across the top of your cheekbones, blending upwards and outwards toward the temples․ Gently dot highlighter along the bridge of your nose for a slimming effect, and blend well․ Finally, apply a small dab to the Cupid’s bow (the curve of your lips) for added brightness․ Use light, gentle strokes and blend thoroughly for a natural, lit-from-within look that enhances your features without appearing overly done․
6․3 Layering Highlighter for a Radiant Finish
Layering highlighter creates a radiant, multi-dimensional glow․ Start with a light base layer on key areas like cheekbones, nose, and Cupid’s bow․ Use a fan brush for a subtle application, then intensify with a smaller concealer brush for targeted highlighting․ Apply a medium shade for depth and finish with a subtle shimmer for a luminous effect․ Blend thoroughly between layers to avoid harsh lines․ Set with a setting spray for long-lasting results and touch up as needed for a fresh, glowing complexion․
Face-Specific Contouring and Highlighting
Discover tailored techniques for contouring and highlighting based on your face shape․ Learn how to enhance round, oval, heart, and square faces with personalized methods for a flattering look․
7․1 Contouring and Highlighting for Round Faces
For round faces, contouring and highlighting aim to create length and angles․ Apply contour shades to the temples, jawline, and sides of the nose to slim and elongate․ Use a lighter highlighter on the forehead, chin, and nose tip for brightness․ Avoid wide highlights on the cheeks to prevent rounding․ Blend thoroughly for a seamless look․ Emphasize the center of the face to draw attention upward, creating a balanced, defined appearance tailored to round facial structures․
7․2 Contouring and Highlighting for Oval Faces
Oval faces benefit from subtle contouring to enhance their natural symmetry․ Apply contour shades to the temples, jawline, and nose sides to define structure without over-defining․ Highlight the forehead, chin, and nose tip for brightness․ Use soft, blendable products to maintain a natural look, feathering contours and highlights for seamless results․ Choose shades that complement your skin tone, ensuring a balanced, radiant appearance that complements the oval face’s inherent harmony and proportion․
7․3 Contouring and Highlighting for Heart-Shaped Faces
Heart-shaped faces benefit from contouring that balances the broader forehead and temples with a narrower chin․ Apply contour shades to the temples, hairline, and jawline to create symmetry․ Highlight the chin, nose tip, and under the brows to draw attention downward․ Use a medium-toned bronzer for definition and a light highlighter for brightness․ Blend softly to avoid harsh lines, ensuring a natural, harmonious look that complements the face’s unique structure while enhancing its radiant appeal․
7․4 Contouring and Highlighting for Square Faces
For square faces, contouring aims to soften strong angles and create a more balanced look․ Apply contour shades to the temples, jawline, and sides of the nose to reduce width․ Highlight the forehead, under the eyes, and along the nose to draw light to the center․ Use lighter shades to create a slimmer appearance and blend thoroughly for a seamless finish․ This technique helps soften the square shape, creating a more oval-like illusion while enhancing natural beauty and radiance․ Proper blending is key to achieving a polished, professional look․
Common Mistakes to Avoid
Over-contouring, incorrect highlighter placement, and poor blending are common errors․ Ensure contour shades complement your skin tone and blend seamlessly for a natural, polished look always․
8․1 Over-Contouring and How to Prevent It
Over-contouring can make your features appear harsh and unnatural․ To prevent this, start with light layers and build gradually․ Choose a contour shade only one to two tones deeper than your skin tone for a subtle effect․ Blend thoroughly, especially around the edges, to avoid noticeable lines․ Use a light hand and focus on key areas like the hollows of the cheeks, jawline, and temples․ Remember, the goal is to enhance, not exaggerate, your natural structure․ Less is often more in achieving a seamless, natural look․
8․2 Incorrect Highlighter Placement and How to Fix It
Incorrect highlighter placement can draw attention to the wrong areas or make your face look unnatural․ Common mistakes include applying highlighter too heavily or in inappropriate spots, such as the T-zone or overly wide areas of the face․ To fix this, identify your natural high points (cheekbones, nose, cupid’s bow) and apply highlighter sparingly․ Use a light hand and blend well for a seamless look․ Avoid over-highlighting oily areas and opt for a shade that complements your skin tone for a radiant, natural finish․
8․3 Poor Blending and How to Achieve a Seamless Look
Poor blending can make contour and highlight lines visible, ruining the natural effect․ To fix this, use a beauty blender or fluffy brush to softly blend edges․ Apply thin layers, allowing each to set before adding more․ Stipple or sweep gently, blending upwards and outwards for a smooth transition․ Focus on key areas like the jawline, temples, and under the contour․ Lightly buff with a clean brush for a seamless finish․ Proper blending ensures your makeup looks effortless and professional, enhancing your natural features without harsh lines․

Troubleshooting Contouring and Highlighting Issues
Addresses common challenges like uneven application, over-shimmer, and poor blending․ Learn quick fixes for contouring mishaps and how to adapt techniques for different lighting conditions seamlessly․
9․1 Fixing Uneven Contour Application
Uneven contour can be corrected by blending thoroughly with a fluffy brush or beauty blender․ Start with light layers, building depth gradually․ Use a setting powder to soften harsh lines and ensure a seamless finish․ If areas appear too dark, blend upward and outward with a clean brush․ For overly defined contours, dab a damp sponge lightly over the area to diffuse the product․ Proper blending is key to achieving a natural, polished look․ Practice makes perfect in mastering even contour distribution․
9․2 Correcting Overly Shimmery Highlighter
If your highlighter appears too shimmery, gently blot the area with a clean tissue to remove excess product․ Apply a light layer of setting powder over the highlighter to mattify the finish․ For a more subtle look, layer a sheer concealer or foundation over the area to neutralize the shimmer․ Use a fluffy brush to blend the edges for a seamless transition․ If the highlighter is still too bold, start over with a lighter hand or opt for a matte highlighter for a natural glow․ A pro tip: choose highlighters suited to your skin type for the best results․
9․3 Adjusting Contour and Highlighter for Different Lighting
Lighting significantly impacts how contour and highlighter appear․ In natural light, apply lighter layers for a subtle look․ Under artificial or low light, opt for softer, blendable products to avoid harsh lines․ For photography, use slightly deeper contour shades and highlighter to ensure visibility․ Always blend thoroughly and set with powder to maintain a seamless finish across lighting conditions․ Adjusting your technique ensures your look remains flattering in any setting, whether natural, indoor, or photographed․
Advanced Contouring and Highlighting Techniques
Master advanced techniques like multi-tone contouring for dimension, strobing for radiant highlights, and feature-specific contouring for eyes, lips, and nose․ Elevate your makeup artistry with precision and creativity․
10․1 Multi-Tone Contouring for Depth and Dimension
Multi-tone contouring involves layering shades to create a natural, dimensional look․ Start with a light base, then add medium tones for structure, and finish with deep shades for definition․ Apply lighter shades to high points like cheekbones, while deeper tones define areas like the jawline and temples․ Blend thoroughly with a contour brush for a seamless transition․ This technique enhances facial features, creating depth and dimension for a polished, professional finish․ It’s ideal for those seeking a more nuanced, sculpted appearance․
10․2 Strobing: A Modern Highlighting Technique
Strobing is a modern highlighting technique focusing on applying highlighter to key areas without contouring․ It creates a radiant, lit-from-within glow by emphasizing high points like cheekbones, nose, cupid’s bow, and brow bone․ Use a light hand and blend well for a natural look․ Choose a highlighter matching your skin tone—champagne for medium tones, peach for fair skin, and bronze for deeper tones․ This versatile technique suits all occasions, offering a fresh, healthy appearance with minimal effort․
10․3 Contouring for Specific Features: Eyes, Lips, Nose
Contouring specific features enhances their definition․ For eyes, use a light shade under the brow bone and a darker hue in the crease for depth․ Lips can be contoured by lining the Cupid’s bow and blending outward․ The nose is slimmed by applying contour along the sides and blending upwards․ These techniques create a sculpted, polished look, drawing attention to desired areas while maintaining natural proportions․ Precision and blending are key for a seamless, professional finish․

Maintaining Your Contour and Highlight
Maintain your contour and highlight by setting with powder, blending touch-ups, and using long-lasting products․ Proper removal ensures skin health and prevents buildup․ Cleanse thoroughly nightly․
11․1 Setting Your Look with Powder
Setting your contour and highlight with powder ensures longevity and prevents oils from disrupting your makeup․ Use a light hand to dust translucent powder over contoured areas, focusing on the T-zone․ This step seals your base, enhancing the staying power of both contour and highlight․ For a flawless finish, apply powder with a fluffy brush, gently sweeping across the face․ Avoid over-powdering highlighted areas to maintain their radiant effect․ Proper setting helps your makeup last all day, keeping your contour sharp and highlights luminous․
11․2 Touch-Up Tips for Long-Lasting Contour and Highlight
To maintain your contour and highlight throughout the day, use blotting papers to absorb excess oil without disturbing your makeup․ Carry travel-sized contour and highlight products for quick touch-ups․ Gently blend any areas where makeup may have shifted using a small brush․ Avoid over-powdering, as it can dull your highlights․ For a fresh look, spritz a setting spray to revive your base․ Finally, use a small concealer brush to precision-touch-up areas like the nose or cupid’s bow for a polished finish․
11․3 Removing Contour and Highlighter Properly
Proper removal of contour and highlighter ensures healthy skin and prevents clogged pores․ Start with a gentle oil-based cleanser to dissolve makeup, then rinse with warm water․ Use a micellar water to remove any residue․ Exfoliate once a week to eliminate stubborn particles․ Follow up with a hydrating toner and moisturizer to restore skin balance․ Avoid harsh scrubbing, which can irritate your skin․ This thorough yet gentle routine keeps your skin clear and prepared for the next makeup application․
Mastering contouring and highlighting enhances your natural beauty, creating definition and radiance․ Practice, patience, and the right techniques will help you achieve a flawless, professional look effortlessly․
12․1 Summary of Key Points
Contouring and highlighting are transformative makeup techniques that enhance facial features by creating depth and radiance․ Understanding your face shape, selecting the right products, and mastering blending are crucial for natural results․ Avoid common mistakes like over-contouring and incorrect highlighter placement; Practice and experimentation will refine your skills, helping you achieve a polished, professional look․ These techniques empower you to accentuate your best features and create a balanced, radiant appearance tailored to your unique beauty․
12․2 Encouragement to Practice and Experiment
Practice is key to mastering contouring and highlighting․ Experiment with different techniques and products to find what works best for you․ Start with natural looks and gradually explore more dramatic styles․ Don’t be afraid to make mistakes—they’re part of the learning process․ Celebrate small victories, like achieving a seamless blend or finding your perfect highlighter shade․ Remember, makeup is a form of self-expression, so enjoy the journey and have fun discovering your unique style!
12․3 Final Thoughts on the Importance of Contouring and Highlighting
Contouring and highlighting are powerful tools that transform your makeup look, enhancing natural features and creating balance․ These techniques empower you to customize your appearance, boosting confidence and self-expression․ Whether for daily wear or special occasions, contouring and highlighting offer versatility and artistry․ Embrace these techniques as a way to celebrate your unique beauty and elevate your makeup game․ Remember, practice makes perfect—so keep experimenting and enjoying the process of perfecting your craft!